Generating SeqAn KNIME Nodes
- Learning Objective
- You will learn how to import applications written in SeqAn into the KNIME Eclipse plugin. After completing this tutorial, you will be able to use self made applications in KNIME workflows.
- Difficulty
- Very basic
- Duration
- 1 h
- Prerequisites
- KNIME SDK
- You can download it from the KNIME Download Site (at the end of the page). We will use Version 2.8. (We assume that you have installed it to $HOME/eclipse_knime_2.8. but it could be anywhere).
- git
- For Downloading the latest GenericKnimeNodes.
- Apache Ant
- The Generic KNIME Plugins project uses Apache Ant as the build system. On Linux and Mac, you should be able to install it through your package manager. For Windows, see the Apache Ant Downloads.
We will generate a simple SeqAn KNIME node from a SeqAn app that reads a fastq file from disk and just writes it back. We start by installing the necessary software. Afterwards, we explain which steps are required in order to prepare a SeqAn app to be used in KNIME, and finally, we show how to import the app into KNIME. The following section provides some more information on the plugin structure and where the necessary information is stored. Note that this tutorial is mainly written for MacOS and Linux users, but Windows users should also be able to follow through.
Preparation: Downloading GenericKnimeNodes
We will work in a new directory knime_node (we will assume that the directory is directly in your $HOME for the rest of the tutorial).
knime_node # git clone git://github.com/genericworkflownodes/GenericKnimeNodes.git
Preparation: Installing KNIME File Handling
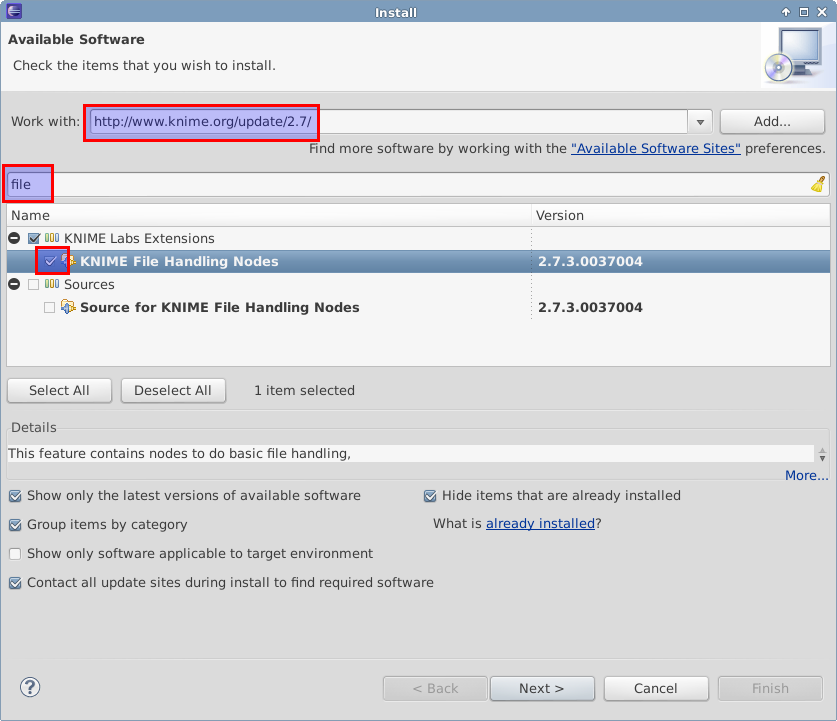
We need to install support for file handling nodes in KNIME. For this, open the window for installing Eclipse plugins; in the program’s main menu: Help > Install New Software....
Here, enter http://www.knime.org/update/2.8/ into the Work with: field, enter file into the search box, and finally select KNIME File Handling Nodes in the list. Then, click Next and follow through with the installation of the plugin. When done, Eclipse must be restarted.
Generating KNIME Nodes for SeqAn Apps
You can generate a workflow plugin directory for the SeqAn apps using the prepare_workflow_plugin target.
In order for your application to turn into a KNIME node, you have to add the line:
set (SEQAN_CTD_EXECUTABLES ${SEQAN_CTD_EXECUTABLES} <my_app> CACHE INTERNAL "")
to the end of the CMakeList.txt file of your application.
The following example will demonstrate the creation of a SeqAn app and its registration as a KNIME node.
~ # svn co http://svn.seqan.de/seqan/trunk seqan-trunk
~ # cd seqan-trunk
~ # ./util/bin/skel.py app knime_node sandbox/my_sandbox
Now open the file seqan-trunk/sandbox/my_sandbox/apps/knime_node/knime_node.cpp and replace its content with the one found in seqan-trunk/core/demos/knime_node.cpp. The code implements the reading of a read file and its storage somewhere on the disk.
In order to register the app knime_node, you simply add the line
set (SEQAN_CTD_EXECUTABLES ${SEQAN_CTD_EXECUTABLES} knime_node CACHE INTERNAL "")
to seqan-trunk/sandbox/my_sandbox/apps/knime_node/CMakeList.txt.
Then, you can generate the Knime Nodes/Eclipse plugin. First, change to the directory GenericKnimeNodes that we cloned using git earlier. We then execute ant and pass the variables knime.sdk with the path to the KNIME SDK that you downloaded earlier and plugin.dir with the path of our plugin directory.
~ # mkdir -p seqan-trunk-build/release
~ # seqan-trunk-build/release
~ # cd seqan-trunk-build/release
release # cmake ../../seqan-trunk
release # make prepare_workflow_plugin
release # cd ~/knime_node/GenericKnimeNodes
GenericKnimeNodes # ant -Dknime.sdk=${HOME}/eclipse_knime_2.8.0 \
                      -Dplugin.dir=${HOME}/seqan-trunk-build/release/workflow_plugin_dir
The generated files are within the generated_plugin directory of the directory GenericKnimeNodes.
If you ran into problems, you may copy the file my_sandbox.zip, which contains a fully functional sandbox with the knime_node app and the adjusted CMakeList.txt file. You still have to call ant though.
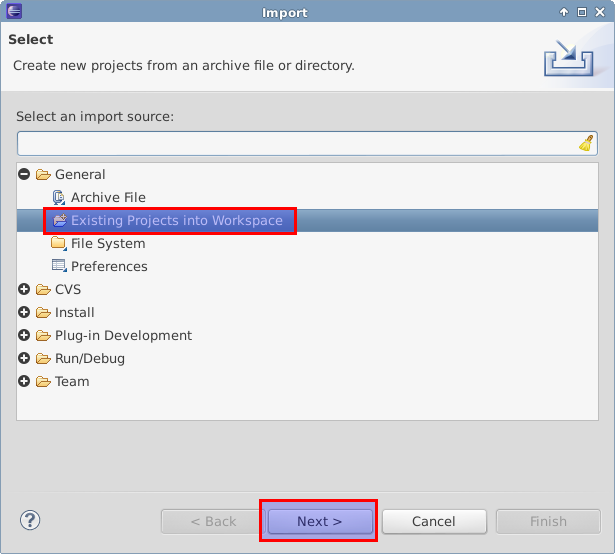
Importing the Generated Projects into Eclipse
In the main menu, go to File > Import.... In the Import window, select General > Existing Project Into Workspace.
In the next dialog, click Browse... next to Select root directory.
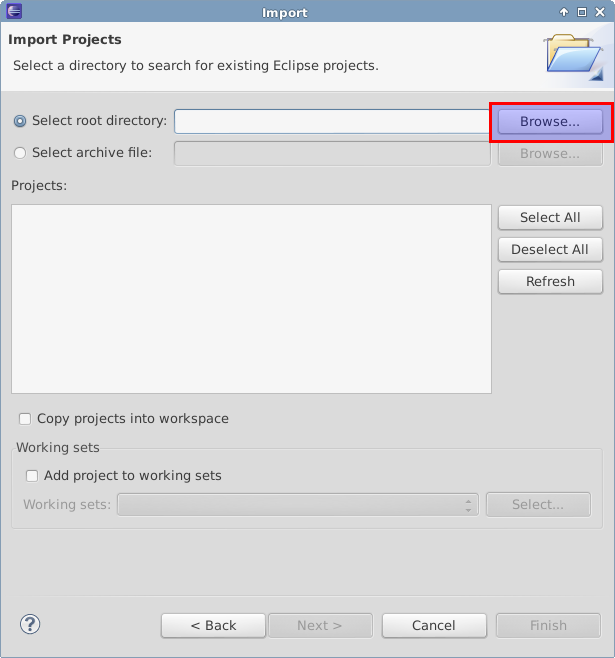
Then, select the directory of your “GenericWorkflowNodes” checkout. The final dialog should then look as follows.
Clicking finish will import (1) the GKN classes themselves and (2) your generated plugin’s classes.

Now, the packages of the GKN classes and your plugin show up in the left Package Explorer pane of Eclipse.

Tip
Synchronizing ant build result with Eclipse.
Since the code generation happens outside of Eclipse, there are often problems caused by Eclipse not recognizing updates in generated ‘’.java’’ files. After each call to ant, you should clean all built files in all projects by selecting the menu entries Project > Clean..., selecting Clean all projects, and then clicking OK.
Then, select all projects in the Package Explorer, right-click and select Refresh.
Tip
You might get a warning with in one of the KNIME files. In order to remove it you need to download the KNIME’s test environment, but you can just ignore the error in our case.
Launching Eclipse with our Nodes
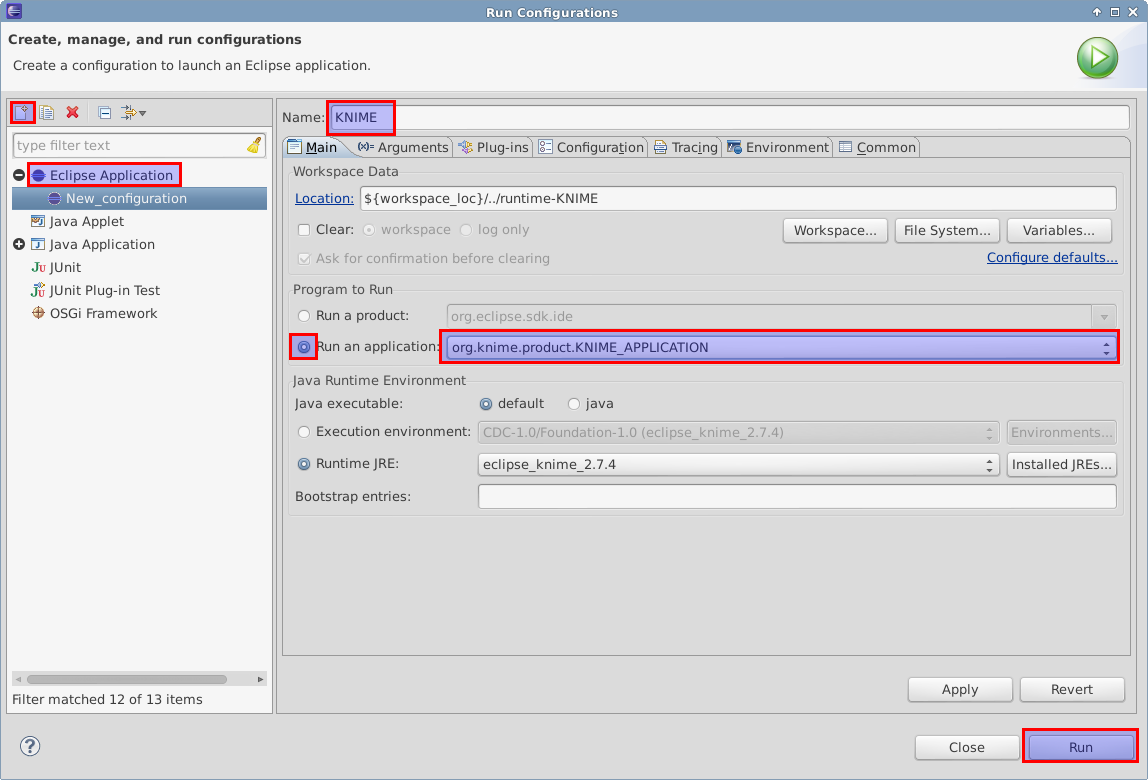
Finally, we have to launch KNIME with our plugin. We have to create a run configuration for this. Select Run > Run Configurations....
In the Run Configurations window, select Eclipse Application on the left, then click the small New launch configuration icon on the top left (both marked in the following screenshot). Now, set the Name field to “KNIME”, select Run an application and select org.knime.product.KNIME_APPLICATION in the drop down menu. Finally, click Run.
Your tool will show up in the tool selector in Community Nodes.
Important
Sometimes KNIME complains about the Java version you are using. In that case, you can use Java 1.6. as shown in Choosing The JRE Version.
Important
If you are running a MacOS you might need to add -Xms40m -Xmx512M -XX:MaxPermSize=256m -Xdock:icon=../Resources/Eclipse.icns -XstartOnFirstThread -Dorg.eclipse.swt.internal.carbon.smallFonts -server to the VM argument box of your Run Configuration.
You should now be able to use the created node in a KNIME workflow. The following sections provide additional information about the structure of the plugin and where the crucial information is stored.
Plugin Overview
KNIME nodes are shipped as Eclipse plugins. The GenericKnimeNodes (GWN) package provides the infrastructure to automatically generate such nodes from the description of their command line. The description of the command line is kept in XML files called Common Tool Descriptor (CTD) files. The input of the GWN package is a directory tree with the following structure.
plugin_dir
  │
  ├── plugin.properties
  │
  ├── descriptors (place your ctd files and mime.types here)
  │
  ├── payload (place your binaries here)
  │
  ├── icons (the icons to be used must be here)
  │
  ├── DESCRIPTION (A short description of the project)
  │
  ├── LICENSE (Licensing information of the project)
  │
  └── COPYRIGHT (Copyright information of the project)
- plugin.properties
- File with the plugin configuration.
- descriptors
- Directory with the CTD files and a mime.types file. This mime.types file contains a mapping between MIME types and file extensions. There is one CTD file called ${app_name}.ctd.
- payload
- ZIP archives with the binaries are located here. This directory has to be present even if the directory is empty. Also, you need a file binaries.ini in this directory which can be empty or contain environment variable definitions as name=value lines.
- icons
- Some icons: A file category.png (15x15 px) for categories in the KNIME tool tree. A file ‘’splash.png’ (50x50 px) with an icon to display in the KNIME splash screen. One for each app, called ${app_name}.png
- DESCRIPTION
- A text file with your project’s description.
- LICENSE
- A file with the license of the project.
- COPYRIGHT
- A file with copyright information for the project.
The GWN project provides tools to convert such a plugin directory into an Eclipse plugin. This plugin can then be launched together with KNIME. The following picture illustrates the process.

Anatomy of a Plugin Directory
You can download a ZIP archive of the resulting project from the attached file workflow_plugin_dir.zip. We will ignore the contents of icons, DESCRIPTION, LICENSE, and COPYRIGHT here. You can see all relevant details by inspecting the ZIP archive.
The file plugin.properties
The content of the file plugin.properties is as follows:
# the package of the plugin
pluginPackage=de.seqan

# the name of the plugin
pluginName=SeqAn

# the version of the plugin
pluginVersion=1.5.0.201309051220

# the path (starting from KNIMEs Community Nodes node)
nodeRepositoyRoot=community

executor=com.genericworkflownodes.knime.execution.impl.LocalToolExecutor
commandGenerator=com.genericworkflownodes.knime.execution.impl.CLICommandGenerator
When creating your own plugin directory, you only have to update the first three properties:
- pluginPackage
- A Java package path to use for the Eclipse package.
- pluginName
- A CamelCase name of the plugin.
- pluginVersion
- Version of the Eclipse plugin.
The file descriptors/mime.types
The contents of the file is as shown below. Each line contains the definition of a MIME type. The name of the mime type is followed (separated by a space) by the file extensions associated with the file type. There may be no ambiguous mappings, i.e. giving the extension for both application/x-fasta and application/x-fastq.
application/x-fasta fa fasta
application/x-fastq fq fastq
application/x-sam sam
application/x-bam bam
The file descriptors/samtools_sort_bam.ctd
This file descripes the SortBam tool for sorting BAM files. We do not describe the files descriptors/samtools_sam_to_bam.ctd and descriptors/samtools_bam_to_sam.ctd in the same detail as you can interpolate from here.
<?xml version="1.0" encoding="UTF-8"?>
<tool name="KnimeNode" version="0.1" docurl="http://www.seqan.de" category="" >
        <executableName>knime_node</executableName>
        <description>This is a very simple KNIME node providing an input and output port.</description>
        <manual>This is a very simple KNIME node providing an input and output port. The code should be modified such that the node does something useful
</manual>
        <cli>
                <clielement optionIdentifier="--write-ctd-file-ext" isList="false">
                        <mapping referenceName="knime_node.write-ctd-file-ext" />
                </clielement>
                <clielement optionIdentifier="--arg-1-file-ext" isList="false">
                        <mapping referenceName="knime_node.arg-1-file-ext" />
                </clielement>
                <clielement optionIdentifier="--outputFile" isList="false">
                        <mapping referenceName="knime_node.outputFile" />
                </clielement>
                <clielement optionIdentifier="--outputFile-file-ext" isList="false">
                        <mapping referenceName="knime_node.outputFile-file-ext" />
                </clielement>
                <clielement optionIdentifier="--quiet" isList="false">
                        <mapping referenceName="knime_node.quiet" />
                </clielement>
                <clielement optionIdentifier="--verbose" isList="false">
                        <mapping referenceName="knime_node.verbose" />
                </clielement>
                <clielement optionIdentifier="--very-verbose" isList="false">
                        <mapping referenceName="knime_node.very-verbose" />
                </clielement>
                <!-- Following clielements are arguments. You should consider providing a help text to ease understanding. -->
                <clielement optionIdentifier="" isList="false">
                        <mapping referenceName="knime_node.argument-0" />
                </clielement>
        </cli>
        <PARAMETERS version="1.6.2" xsi:noNamespaceSchemaLocation="http://open-ms.sourceforge.net/schemas/Param_1_6_2.xsd" xmlns:xsi="http://www.w3.org/2001/XMLSchema-instance">
                <NODE name="knime_node" description="This is a very simple KNIME node providing an input and output port.">
                        <ITEM name="write-ctd-file-ext" value="" type="string" description="Override file extension for --write-ctd" required="false" advanced="true" tags="file-ext-override,gkn-ignore" />
                        <ITEM name="arg-1-file-ext" value="" type="string" description="Override file extension for argument 1" restrictions="fastq,fq" required="false" advanced="true" tags="file-ext-override" />
                        <ITEM name="outputFile" value="result.fastq" type="output-file" description="Name of the multi-FASTA output." supported_formats="*.fastq,*.fq" required="false" advanced="false" />
                        <ITEM name="outputFile-file-ext" value="" type="string" description="Override file extension for --outputFile" restrictions="fastq,fq" required="false" advanced="true" tags="file-ext-override,gkn-ignore" />
                        <ITEM name="quiet" value="false" type="string" description="Set verbosity to a minimum." restrictions="true,false" required="false" advanced="false" />
                        <ITEM name="verbose" value="false" type="string" description="Enable verbose output." restrictions="true,false" required="false" advanced="false" />
                        <ITEM name="very-verbose" value="false" type="string" description="Enable very verbose output." restrictions="true,false" required="false" advanced="false" />
                        <ITEM name="argument-0" value="" type="input-file" description="" supported_formats="*.fastq,*.fq" required="true" advanced="false" />
                </NODE>
        </PARAMETERS>
</tool>
Here is a description of the tags and the attributes:
- /tool
- The root tag.
- /tool@name
- The CamelCase name of the tool as shown in KNIME and part of the class name.
- /tool@version
- The version of the tool.
- /toll@category``
- The path to the tool’s category.
- /tool/executableName
- The name of the executable in the payload ZIP’s bin dir.
- /tool/description
- Description of the tool.
- /tool/manual
- Long description for the tool.
- /tool/docurl
- URL to the tool’s documentation.
- /tool/cli
- Container for the <clielement> tags. These tags describe the command line options and arguments of the tool. The command line options and arguments can be mapped to parameters which are configurable through the UI. The parameters are stored in /tool/PARAMETERS
- /tool/cli/clielement
- There is one entry for each command line argument and option.
- /tool/cli/clielement@optionIdentifier
- The identifier of the option on the command line. For example, for the -l` option of ls, this is -l.
- /tool/cli/clielement@isList
- Whether or not the parameter is a list and multiple values are possible. One of true and false.
- /tool/cli/clielement/mapping
- Provides the mapping between a CLI element and a PARAMETER.
- /tool/cli/clielement/mapping@referenceName
- The path of the parameter. The parameters <ITEM>s in /tool/PARAMETERS are stored in nested <NODE> tags and this gives the path to the specific parameter.
- /tool/PARAMETERS
- Container for the <NODE> and <ITEM> tags. The <PARAMETERS> tag is in a diferent namespace and provides its own XSI.
- /tool/PARAMETERS@version
- Format version of the <PARAMETERS> section.
- /tool/PARAMETERS/.../NODE
- A node in the parameter tree. You can use such nodes to organize the parameters in a hierarchical fashion.
- /tool/PARAMETERS/.../NODE@advanced
- Boolean that marks an option as advanced.
- /tool/PARAMETERS/.../NODE@name
- Name of the parameter section.
- /tool/PARAMETERS/.../NODE@description
- Documentation of the parameter section.
- /tool/PARAMETERS/.../ITEM
- Description of one command line option or argument.
- /tool/PARAMETERS/.../ITEM@name
- Name of the option.
- /tool/PARAMETERS/.../ITEM@value
- Default value of the option. When a default value is given, it is passed to the program, regardless of whether the user touched the default value or not.
- /tool/PARAMETERS/.../ITEM@type
- Type of the parameter. Can be one of string, int, double, input-file, output-path, input-prefix, or output-prefix. Booleans are encoded as string with the restrictions attribute set to "true,false".
- /tool/PARAMETERS/.../ITEM@required
- Boolean that states whether the parameter is required or not.
- /tool/PARAMETERS/.../ITEM@description
- Documentation for the user.
- /tool/PARAMETERS/.../ITEM@supported_formats
- A list of supported file formats. Example: "*.bam,*.sam".
- /tool/PARAMETERS/.../ITEM@restrictions
- In case of int or double types, the restrictions have the form min:, :max, min:max and give the smallest and/or largest number a value can have. In the case of string types, restrictions gives the list of allowed values, e.g. one,two,three. If the type is string and the restriction field equals "true,false", then the parameter is a boolean and set in case true is selected in the GUI. A good example for this would be the -l flag of the ls program.
Tip
If a <clielement> does provides an empty optionIdentifier then it is a positional argument without a flag (examples for parameters with flags are -n 1, --number 1).
If a <clielement> does not provide a <mapping> then it is passed regardless of whether has been configured or not.
The samtools_sort_bam tool from above does not provide any configurable options but only two arguments. These are by convention called argument-0 and argument-1 but could have any name.
Also, we always call the program with view -f as the first two command line arguments since we do not provide a mapping for these arguments.
The directory payload
The directory payload contains ZIP files with the executable tool binaries. There is one ZIP file for each platform (Linux, Windows, and Mac Os X) and each architecture (32 bit and 64 bit). The names of the files are binaries_${plat}_${arch}.zip where ${plat} is one of lnx, win, or mac, and ${arch} is one of 32 and 64.
Each ZIP file contains a directory /bin which is used as the search path for the binary given by <executableName>. Also, it provides an INI file /binaries.ini which can be used to define environment variables to set before executing any tools.
The ZIP file can also provide other files in directories such as /share.