Getting Started With SeqAn On Mac OS X Using Xcode
This article describes how to get started with SeqAn on Mac OS X using XCode.
We assume that you want to use MacPorts for installing some dependencies (MacPorts is a package management system that easily allows you to install Unix software on OS X). Of course, if you want to use a different way for installing the dependencies (e.g. using Homebrew) then you are free to do so.
Prerequisites
First, you have to install the Apple Xcode via Apple Developer or preferably Xcode via the Mac App Store.
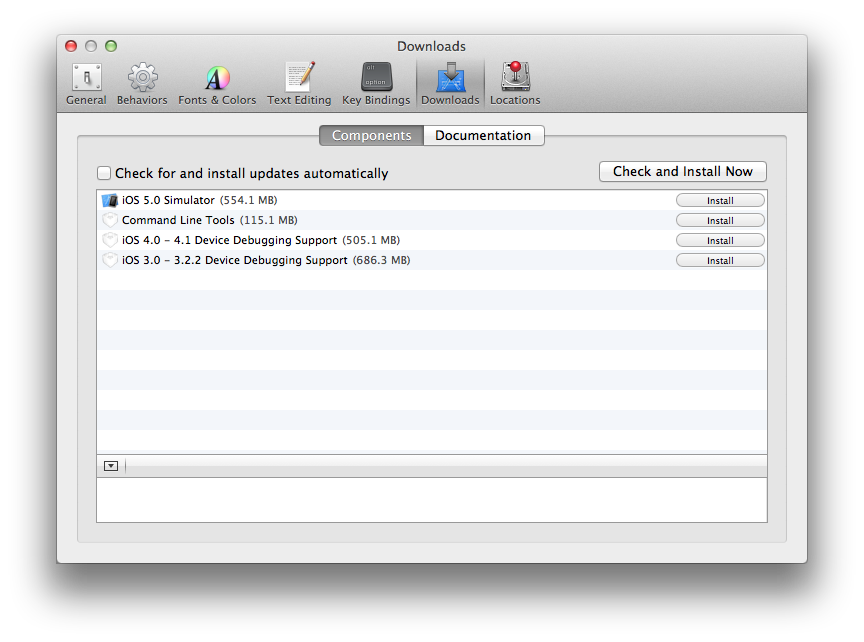
After having done so you also need to install the Command Line Tools. Open Xcode, go to Xcode > Preferences... or simply press ⌘ to open the preferences. Switch to the Downloads tab. In the shown table you will find the Command Line Tools. Click on Install to install them.
Warning
If you already had Xcode installed and you updated to Xcode 4.3 it is likely that xcode-select is not pointing to the new Xcode location.
To make sure you can properly work with Xcode 4.3 please open your Terminal and type:
~ # xcode-select -print-path
The command should output /Applications/Xcode.app/Contents/Developer. If it doesn’t please note down the actual output (for backup purpose) and type in:
~ # sudo xcode-select -switch /Applications/Xcode.app/Contents/Developer
This will configure xcode-select properly and make it work with SeqAn.
Warning
With the current MacPort version of CMake it is no more possible to open sub projects. Either open only the root project seqan.xcodeproj or install our cmake-2.8.9.20120903-g6ef858-dirty-Darwin-i386.dmg patched version of CMake instead.
Note: The package installs the binary at /usr/usr/bin/cmake. Please add the following line to your ~/.profile file:
export PATH=/usr/usr/bin:$PATH
After installing the Xcode SDK, please install MacPorts following these instructions. To check that the MacPorts install was successful, enter the following on your shell. If the port program is found then you can go on.
~ # port info
Next, install Subversion using the port command.
~ # sudo port install subversion
There is a problem with the current version of CMake. Please read Problem with CMake box above and either install our patched version of CMake (see attachments) or the current MacPort version which has a problem with sub projects:
~ # sudo port install cmake
Install
Now, go to the directory you want to keep your SeqAn install in (e.g. Development in your home folder).
~ # cd $HOME/Development
Then, use Subversion to retrieve the current SeqAn trunk:
Development # svn co https://github.com/seqan/seqan/branches/master seqan-trunk
You can now find the whole tree with the SeqAn library and applications in $HOME/Development/seqan-trunk.
A First Build
Next, we will use CMake to create an Xcode project for building the applications, demo programs (short: demos), and tests. For this, we create a separate folder seqan-trunk-build on the same level as the folder seqan-trunk.
# Development # mkdir -p seqan-trunk-build/xcode
The resulting directory structure will look as follows.
~/Development
  ├─ seqan-trunk             source directory
  └┬ seqan-trunk-build
   └─ xcode                  build directory
Within the build directory xcode, we call CMake to generate Xcode project files.
Development # cd seqan-trunk-build/xcode
xcode # cmake ../../seqan-trunk -G Xcode
This will generate several Xcode project files in xcode, namely for the SeqAn core applications, demos, and tests. The same will happen for the extras and sandbox directories.
Now, open the project for the core applications:
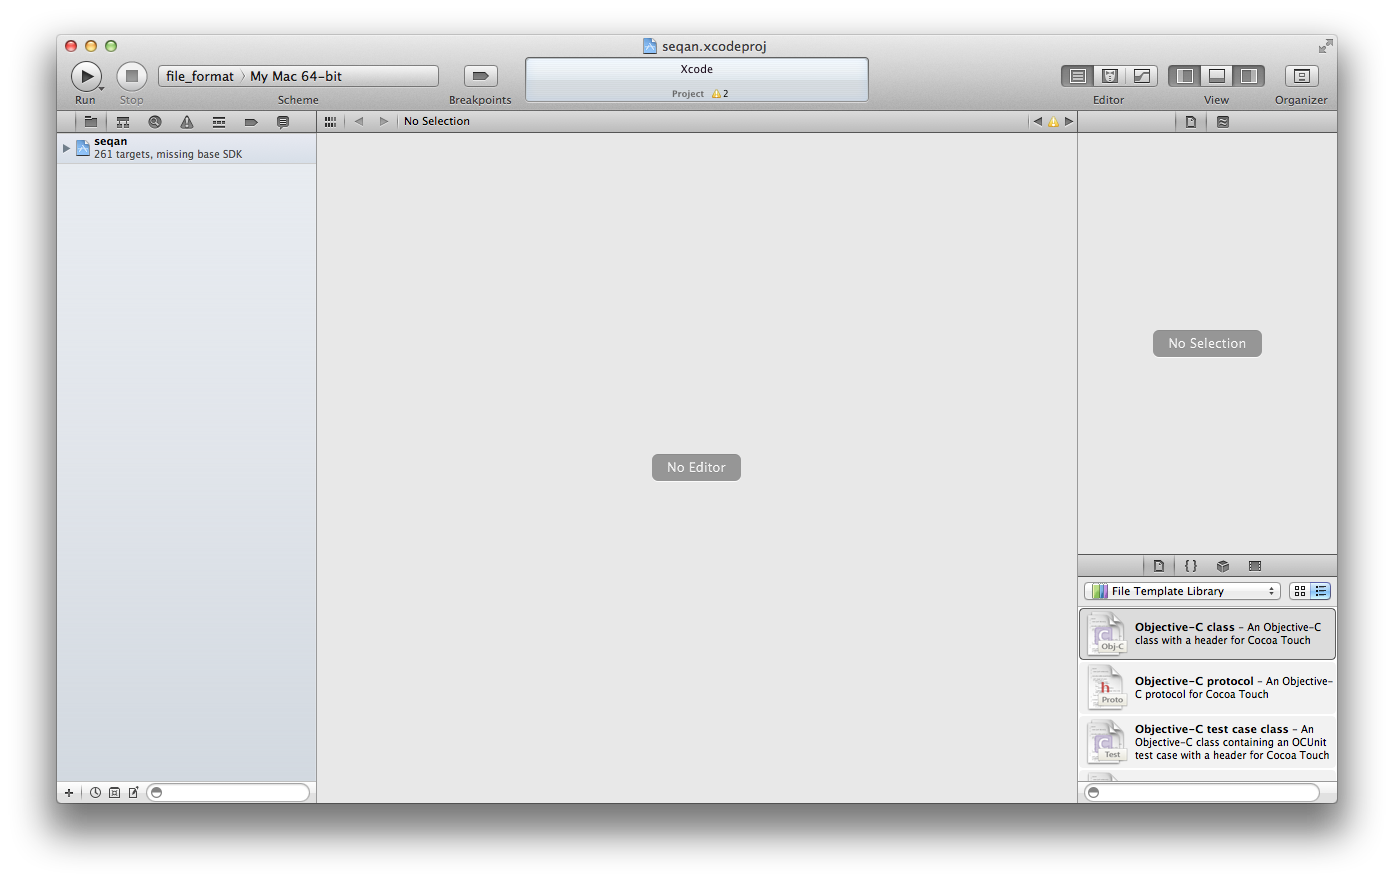
# xcode # open seqan.xcodeproj
Xcode starts and will look like this:
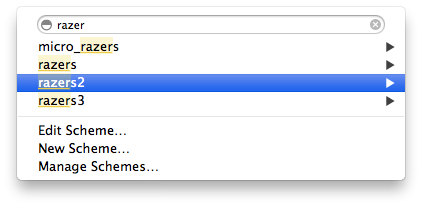
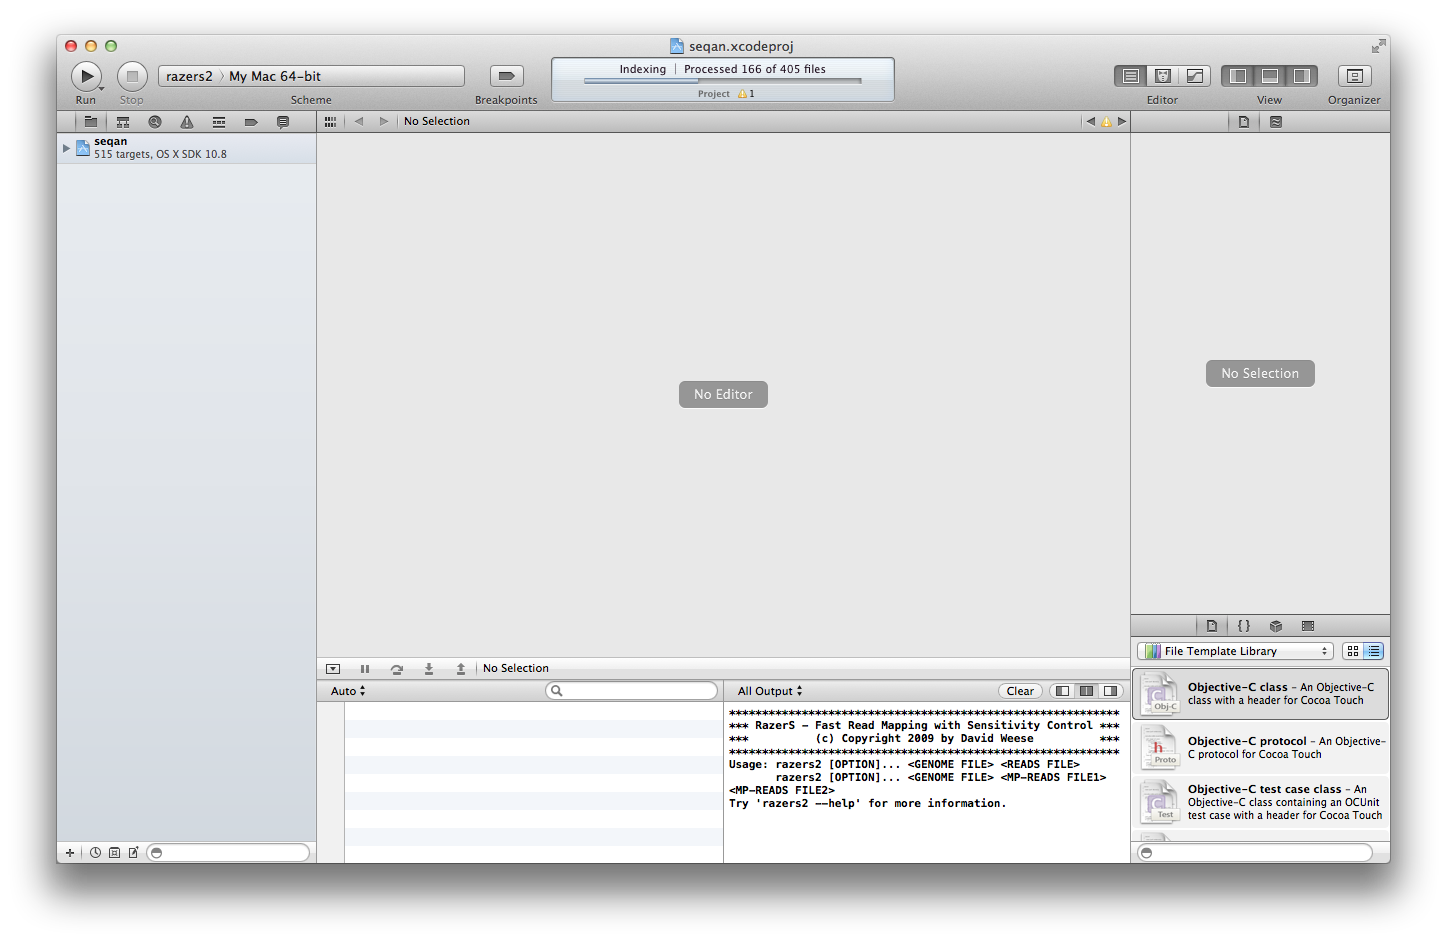
Now we are ready to compile and run our first application. For this, please choose the target razers2 in the top left corner of your Xcode application. When selected click on Run just left to where you chose the target.
Optionally, we could also use “ALL_BUILD” instead of “razers2”. However, this can take a long time and is not really necessary.
After having compiled and run razers2 your Xcode should display razers2‘s output in the bottom right area.
Hello World!
Now, let us create a sandbox for you. This sandbox will be your local workspace and you might want to have it versionized on your own Subversion repository at a later point. All of your development will happen in your sandbox.
We go back to the source directory and then use the SeqAn code generator to create a new sandbox.
xcode # cd ../../seqan-trunk
seqan-trunk # ./util/bin/skel.py repository sandbox/my_sandbox
Now that you have your own working space, we create a new application first_app.
seqan-trunk # ./util/bin/skel.py app first_app sandbox/my_sandbox
Details about the code generator are explained in Using The Code Generator.
Now, we go back into the build directory and call CMake again to make it detect the added app.
seqan-trunk # cd ../seqan-trunk-build/xcode
xcode # cmake .
Tip
When and where do you have to call CMake?
CMake is a cross-platform tool for creating and updating build files (IDE projects or Makefiles). When you first create the build files, you can configure things such as the build mode or the type of the project files.
Whenever you add a new application, a demo or a test or whenever you make changes to CMakeLists.txt you need to call CMake again. Since CMake remembers the settings you chose the first time you called CMake in a file named CMakeCache.txt, all you have to do is to switch to your debug or release build directory and call “cmake .” in there.
~ # cd $HOME/Development/seqan-trunk-build/xcode
debug # cmake .
Do not try to call “cmake .” from within the seqan-trunk directory but only from your build directory.
The step above creates the starting point for a real-world application, including an argument parser and several other things that are a bit too complicated to fit into the Getting Started tutorial. Therefore, we will replace the program of the app first_app with a very simple example program.
Select the file /Sources/first_app/Source Files/first_app.cpp in Xcode and open it:

Replace its contents with the following:
#include <iostream>
#include <seqan/sequence.h>  // CharString, ...
#include <seqan/file.h>      // to stream a CharString into cout

int main(int, char const **)
{
    std::cout << "Hello World!" << std::endl;
    seqan::CharString mySeqAnString = "Hello SeqAn!";
    std::cout << mySeqAnString << std::endl;
    return 1;
}
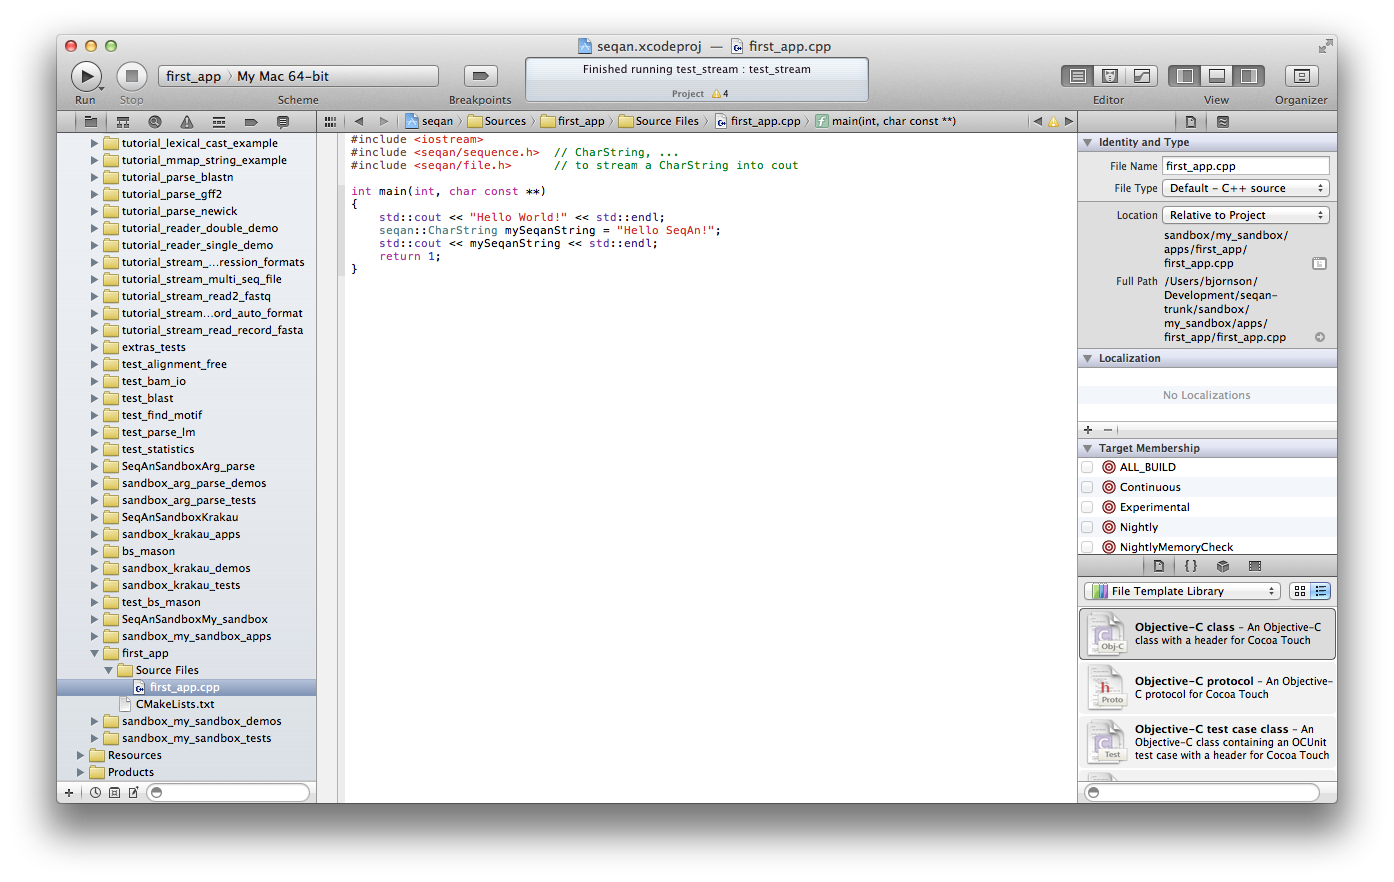
Afterwards, you can simply compile and run your application by clicking on the Run button on the very top left corner in Xcode.
On completion, you should see the following output:
Hello World!
Hello SeqAn!
Congratulations, you have successfully created your first application within the SeqAn build system with Xcode!
Further Steps
As a next step, we suggest the following:
- Continue with the Tutorials
- Look around in the files in sandbox/my_sandbox/apps/first_app or the demos in core/demos and extras/demos.
- For the tutorial, using the SeqAn build system is great! If you later want to use SeqAn as a library, have a look at Integration with your own Build System.