Getting Started With SeqAn On Linux Using Eclipse CDT
This article describes how to get started with SeqAn on Linux using Eclipse CDT.
We assume that you are using the Debian or a Debian-like Linux distributions such as Ubuntu. The only difference to other distributions is the name of the packages and the package management system in the Prerequisites section. It should be very simple for you to tailor these instructions to your requirements.
Prerequisites
Use the following command line to install the required dependencies: the Subversion client, the GNU C++ compiler, CMake for the build system, the Python script interpreter for running helper scripts, and Eclipse with the CDT plugin for C++ development.
~ # sudo apt-get install subversion g++ cmake python eclipse-cdt
The following command line installs optional dependencies: developer versions of zlib and libbzip2 (for compressed I/O support) and the Boost library (required by a few apps).
~ # sudo apt-get install zlib1g-dev libbz2-dev libboost-dev
Install
Now, go to the directory you want to keep your SeqAn install in (e.g. Development in your home folder).
~ # cd $HOME/Development
Then, use Subversion to retrieve the current SeqAn trunk:
Development # svn co https://github.com/seqan/seqan/branches/master seqan-trunk
You can now find the whole tree with the SeqAn library and applications in seqan-trunk.
A First Build
We will now use CMake to create Eclipse CDT project files. For this, we create a separate folder seqan-trunk-build on the same level as the folder seqan-trunk.
Development # mkdir seqan-trunk-build
When using Eclipse CDT, we have to create separate project files for debug builds (including debug symbols with no optimization) and release builds (debug symbols are stripped, optimization is high). Thus, we create a subdirectory for each build type. We start with debug builds since this is best for learning: debug symbols are enabled and assertions are active
Warning
Compiling debug mode yields very slow binaries since optimizations are disabled. Compile your programs in release mode if you want to run them on large data sets.
The reason for disabling optimizations in debug mode is that the compiler performs less inlining and does not optimize variables away. This way, debugging your programs in a debugger becomes much easier.
Development # mkdir seqan-trunk-build/debug-eclipse
Development # cd seqan-trunk-build/debug-eclipse
The resulting directory structure will look as follows.
~/Development
  +-- seqan-trunk        source directory
  `-- seqan-trunk-build
      `-- debug-eclipse  build directory with debug symbols
Within the build directory debug-eclipse, we call CMake to generate The Eclipse CDT project in the debug mode.
debug-eclipse # cmake ../../seqan-trunk -G "Eclipse CDT4 - Unix Makefiles" -DCMAKE_BUILD_TYPE=Debug
Now, open Eclipse. If this is your first Eclipse start then you have to select a workspace. This is unrelated to the SeqAn project files generated earlier and you can pick any directory, e.g. use the default.
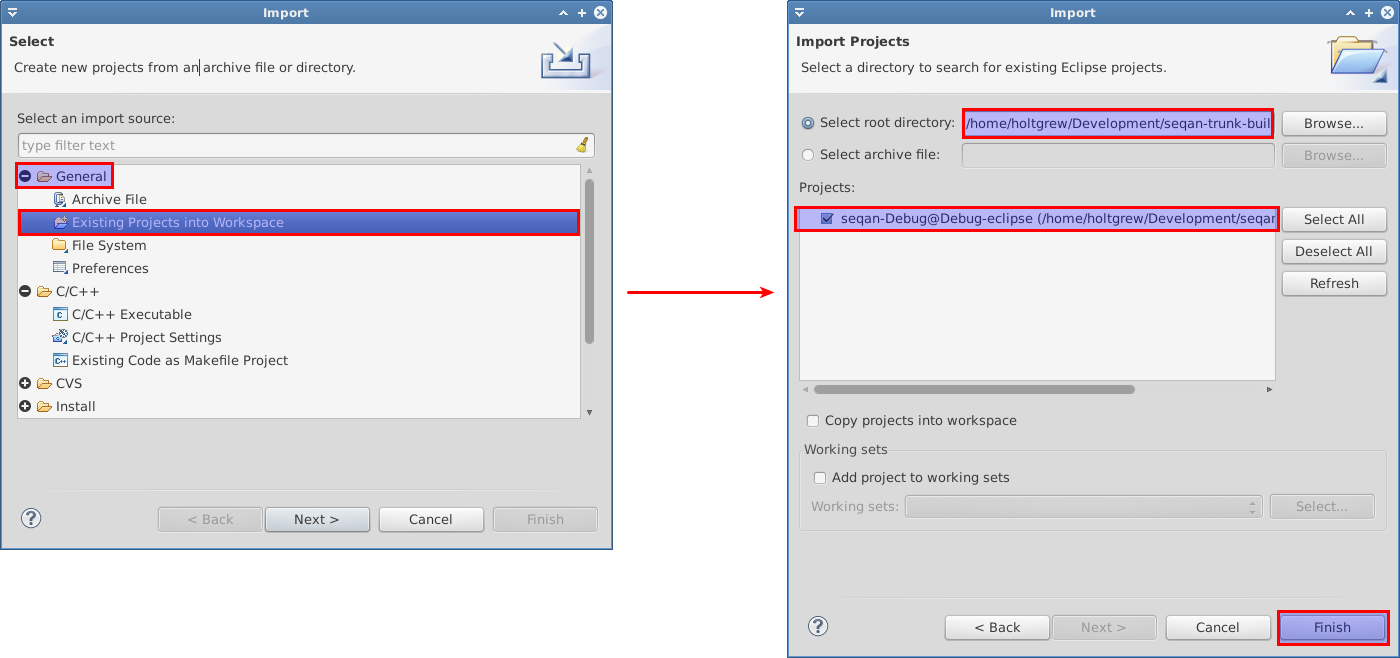
We will now import the generated CDT project: Select the Project Explorer in Eclipse (C++ perspective) and right click somewhere into the view. Select Import... and choose Existing Project into Workspace in the current dialog. Select Next and browse to your build directory in your workspace. Eclipse recognizes that there is a project file and selects it automatically. Confirm the selection with Finish.
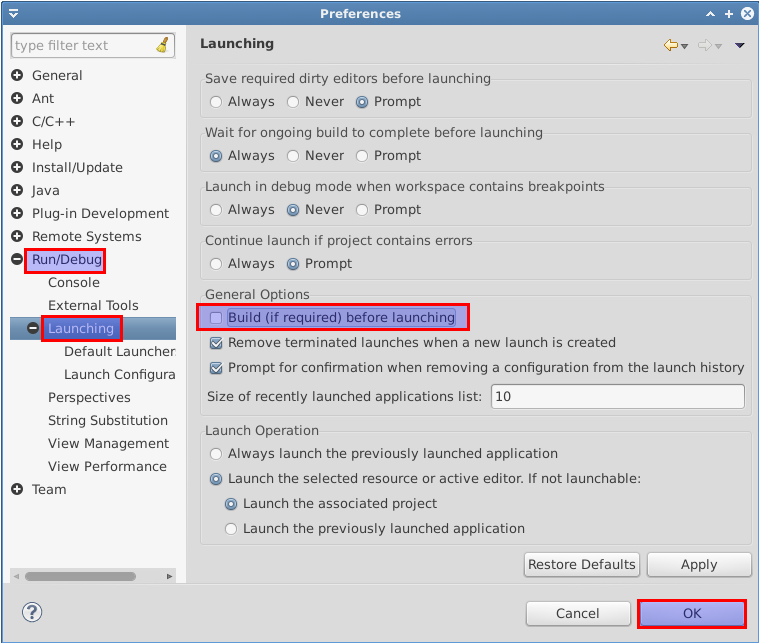
Before you build any target you should change the launch preferences of Eclipse. In the menu select Window > Preferences Go to the menu Run/Debug > Launching and uncheck Build (if required) before launching. This prevents the project for building the target all (default preference), which can take quite a while depending on the system you are using. This can happen if, e.g. you accidentally run a binary before building the target after you changed some code.
Now you have successfully setup Eclipse and can build your targets using the Make Target view (usually on the right hand side of the workbench). To build RazerS 2, open the folder core > apps > razers2 in the Make Target view. Then, right-click on exe] razers2 and select Build Target. This will build the program razers2.

The last line you see on the console at the bottom of the screen should be
Built target razers2
make[2]: Leaving directory `/home/USER/Development/seqan-trunk-build/debug-eclipse'
/usr/bin/cmake -E cmake_progress_start /home/USER/Development/seqan-trunk-build/debug-eclipse/CMakeFiles 0
make[1]: Leaving directory `/home/USER/Development/seqan-trunk-build/debug-eclipse'
Hello World!
Now, let us create a sandbox for you. This sandbox will be your local workspace and you might want to have it versionized on your own Subversion repository at a later point. All of your development will happen in your sandbox.
We go back to the source directory and then use the SeqAn code generator to create a new sandbox.
debug-eclipse # cd ../../seqan-trunk
seqan-trunk # ./util/bin/skel.py repository sandbox/my_sandbox
Now that you have your own working space, we create a new application first_app.
seqan-trunk # ./util/bin/skel.py app first_app sandbox/my_sandbox
Details about the code generator are explained in Using The Code Generator.
Now, we go back into the build directory and call CMake again to make it detect the added app.
seqan-trunk # cd ../seqan-trunk-build/debug-eclipse
debug # cmake .
Tip
When and where do you have to call CMake?
CMake is a cross-platform tool for creating and updating build files (IDE projects or Makefiles). When you first create the build files, you can configure things such as the build mode or the type of the project files.
Whenever you add a new application, a demo or a test or whenever you make changes to CMakeLists.txt you need to call CMake again. Since CMake remembers the settings you chose the first time you called CMake in a file named CMakeCache.txt, all you have to do is to switch to your debug or release build directory and call “cmake .” in there.
~ # cd $HOME/Development/seqan-trunk-build/debug
debug # cmake .
Do not try to call “cmake .” from within the seqan-trunk directory but only from your build directory.
The step above creates the starting point for a real-world application, including an argument parser and several other things that are a bit too complicated to fit into the Getting Started tutorial. Therefore, we will replace the program of the app first_app with a very simple example program.
Open the file sandbox/my_sandbox/apps/first_app/first_app.cpp (in seqan-trunk) with a text editor and replace its contents with the following:
#include <iostream>
#include <seqan/sequence.h>  // CharString, ...
#include <seqan/file.h>      // to stream a CharString into cout

int main(int, char const **)
{
    std::cout << "Hello World!" << std::endl;
    seqan::CharString mySeqAnString = "Hello SeqAn!";
    std::cout << mySeqAnString << std::endl;
    return 1;
}
After CMake is done with building the project files you can simply refresh the imported build project in Eclipse in order to make the applied changes working: In the Project Explorer view, right-click on seqan-Debug@debug-eclipse and select Refresh (F5).
Tip
In some cases the refresh does not work. In this case simply close and reopen Eclipse.
Then, browse to your target in the Make Target view. Double-click on the target of your application and the binary is built immediately.
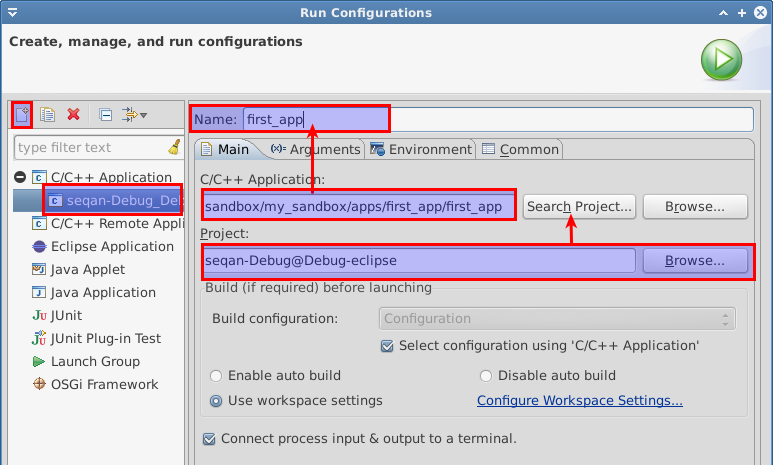
After the build is complete go into the menu and select Run > Run Configurations. Add a new C/C++ Application. Under Project select the seqan-build project. Then you can select your recently built binary under C/C++ Application:. Finally, you can give your application a name. Confirm your selection with Apply and hit the Run button in the bottom of the dialog. Done!
If everything went well, you will see something similar to this:
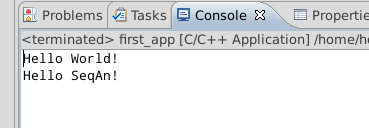
Congratulations, you have successfully created your first application within the SeqAn build system using Eclipse and CDT.
Further Steps
As a next step, we suggest the following:
- Continue with the Tutorials
- Look around in the files in sandbox/my_sandbox/apps/first_app or the demos in core/demos and extras/demos.
- For the tutorial, using the SeqAn build system is great! If you later want to use SeqAn as a library, have a look at Integration with your own Build System.