Getting Started With SeqAn On Windows Using Visual Studio
This tutorial explains how to get started with SeqAn on Windows using Visual Studio.
We use Visual Studio 9 here, but you should be able to easily follow the tutorial if you are using any other supported version (8, 9, 10).
Prerequisites
We assume that you have the following software installed:
- TortoiseSVN for version control and retrieving
- Microsoft Visual Studio for compiling C++ code. If you do not have Visual Studio yet, you can download the free Visual Studio Express Edition from Microsoft. Note that at some point, you can pick between the Express Edition and a demo of the full version. Pick the Express Edition here for a smaller and continuously free version.
- CMake for generating project files
- Python 2.x for the code generator. Note that Python 3 will not work, thus use a Python 2 version.
Also, we assume that your user name is seqan_dev. Replace seqan_dev by your actual user name in the steps below.
Warning
When installing CMake and Python, make sure to let the installers add the paths to the cmake.exe and python.exe binaries to your PATH environment variable.
Install
First, create a new folder in your Windows Explorer for the SeqAn files (e.g. C:\Users\seqan_dev\Development\seqan-trunk). Right click on this folder and choose SVN Checkout... from the context menu.
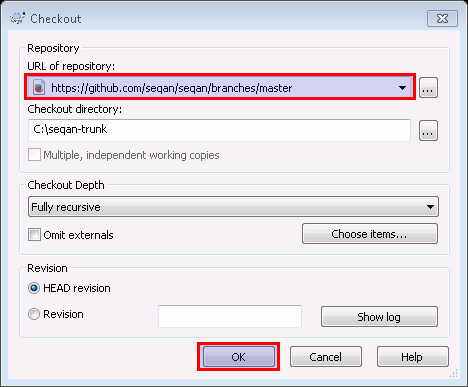
Type the following in the field URL of repository
https://github.com/seqan/seqan/branches/master
The Checkout repository should be the folder you just created. Leave the other settings set to their default (fully recursive, HEAD revision) and click OK.
A First Build
Next, we will use CMake to create a Visual Studio 9 project for building the applications, demo programs (short: demos), and tests.
We will do this using the command prompt. Start a Windows command prompt (Start > All Programs > Accessories > Command Prompt). Then, go to the parent directory of seqan-trunk. There, we create a separate folder seqan-trunk-build:
C:\Users\seqan_dev> C:
C:\Users\seqan_dev> cd C:\Users\seqan_dev\Development
C:\Users\seqan_dev\Development\> mkdir seqan-trunk-build
In the future, we might create a different set of project files (e.g. when we upgrade our Visual Studio version or switch to 64 bit builds). Thus, we create a subdirectory called vs9 for our Visual Studio 9 project.
C:\Users\seqan_dev\Development> mkdir seqan-trunk-build\vs9
C:\Users\seqan_dev\Development> cd seqan-trunk-build\vs9
The resulting directory structure will look as follows.
~/Development
  ├─ seqan-trunk                 source directory
  └─ seqan-trunk-build
     └─ vs9                      Visual Studio 9 project
Within the build directory vs9, we call CMake to generate the Visual Studio 9 project:
C:\Users\seqan_dev\Development\seqan-trunk-build\vs9> cmake ..\..\seqan-trunk -G "Visual Studio 9 2008"
Tip
Using a different version or multiple versions of Visual Studio.
Using a different Visual Studio version is easy: Simply use the appropriate generator. For example, here is how to use the Visual Studio 10 generator:
C:\...\seqan-trunk-build\vs10> cmake ..\..\seqan-trunk -G "Visual Studio 10"
Also, if you want to create 64 bit builds, you need to use another generator. Changing generators in an existing project directory is not possible.
- If you use another version of Visual Studio, you can find out the correct parameter by typing cmake --help.
- If you plan to use different versions of Visual Studio then follow Using Parallel Build Directories.
- Note that you have to choose the Win64 variants of the Visual Studio generators if you want to build 64 bit binaries.
Now, you can open the project file from the Windows explorer: go to the C:\Users\seqan_dev\Development\seqan-trunk-build\vs9\core\apps directory and double click on the file seqan_core_apps.sln. In the Solution Explorer to the left you will find all applications of the SeqAn core.

As an example you can open, compile, and execute the program RazerS 2. Click on the +/▷ in front of razers2 in the Solution Explorer and also on the +/▷ in front of Source Files. Double click on the file razers.cpp to open it in the main window. Right click on razers2 in the Solution Explorer and choose Set as StartUp Project from the context menu.
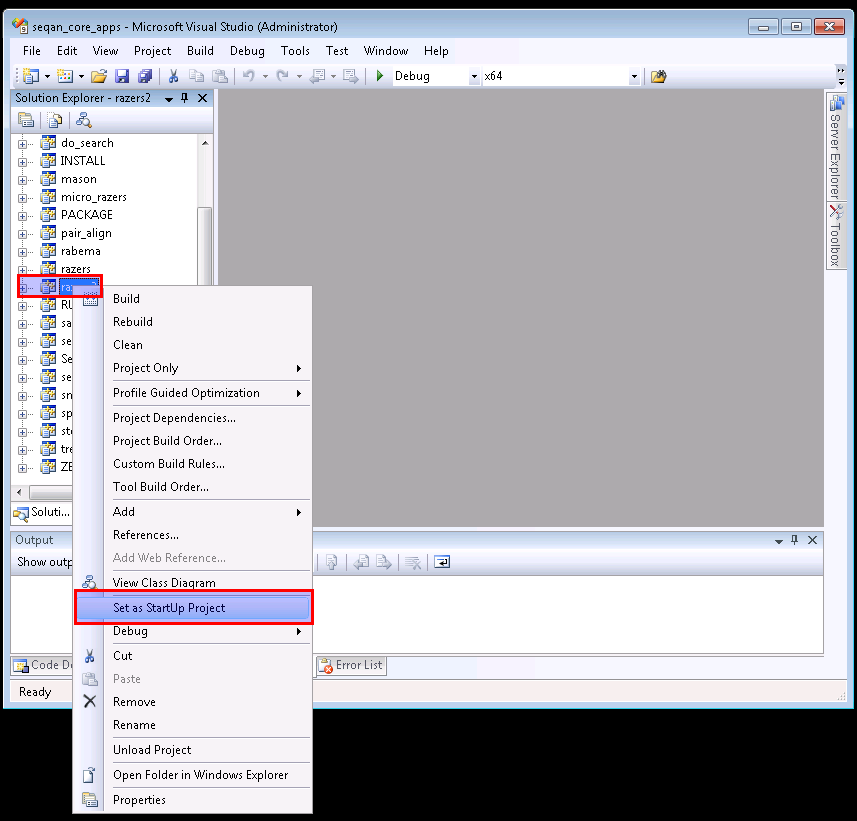
To compile and execute RazerS 2, choose Debug > Start Without Debugging from the main menu or press Ctrl + F5.
On successful compilation and execution, a terminal windows should pop up and display:
***********************************************************
*** RazerS - Fast Read Mapping with Sensitivity Control ***
***          (c) Copyright 2009 by David Weese          ***
***********************************************************
Usage: razers2.exe [OPTION]... <GENOME FILE> <READS FILE>
       razers2.exe [OPTION]... <GENOME FILE> <MP-READS FILE1> <MP-READS FILE2>
Try 'razers2.exe --help' for more information.
Press any key to continue . . .
Tip
‘Starting with and without Debugging in Visual Studio
Starting a program without debugger in Visual Studio will make the program wait for the user pressing a key. This is very useful for inspecting the output. In Debug mode, the program does not wait when executed and the window simply disappears. The reason for this is that when using the debugger, the user is expected to set a breakpoint.
Hello World!
Now, let us create a sandbox for you. This sandbox will be your local workspace and you might want to have it versionized on your own Subversion repository at a later point. All of your development will happen in your sandbox.
We go back to the source directory and then use the SeqAn code generator to create a new sandbox.
C:\Users\seqan_dev\Development\seqan-trunk-build\vs9> cd ..\..\seqan-trunk
C:\Users\seqan_dev\Development\seqan-trunk> python util\bin\skel.py repository sandbox\my_sandbox
Within this sandbox, we can now create a new application using the code generator.
C:\Users\seqan_dev\Development\seqan-trunk> python util\bin\skel.py app first_app sandbox\my_sandbox
Details about the code generator are explained in Using The Code Generator.
Tip
When and where do you have to call CMake?
CMake is a cross-platform tool for creating and updating build files (IDE projects or Makefiles). When you first create the build files, you can configure things such as the build mode or the type of the project files.
Whenever you add a new application, a demo or a test or whenever you make changes to CMakeLists.txt you need to call CMake again. Since CMake remembers the settings you chose the first time you called CMake in a file named CMakeCache.txt, all you have to do is to switch to your debug or release build directory and call “cmake .” in there.
C:\ # cd C:\Users\seqan_dev\Development\seqan-trunk-build\vs9
vs9 # cmake .
Do not try to call “cmake .” from within the seqan-trunk directory but only from your build directory.
The step above creates the starting point for a real-world application, including an argument parser and several other things that are a bit too complicated to fit into the Getting Started tutorial. Therefore, we will replace the program of the app first_app with a very simple example program.
Open the file C:\Users\seqan_dev\Development\seqan-trunk\sandbox\my_sandbox\first_app\first_app.cpp with the Visual Studio text editor and replace its contents with the following:
#include <iostream>
#include <seqan/sequence.h>  // CharString, ...
#include <seqan/file.h>      // to stream a CharString into cout

int main(int, char const **)
{
    std::cout << "Hello World!" << std::endl;
    seqan::CharString mySeqAnString = "Hello SeqAn!";
    std::cout << mySeqAnString << std::endl;
    return 1;
}
Now, we go back into the build directory and call CMake again to make it detect the added app.
C:\Users\seqan_dev\Development\seqan-trunk> cd ..\seqan-trunk-build\vs9
C:\Users\seqan_dev\Development\seqan-trunk-build\vs9> cmake .
Now, you can open the project file C:\Users\seqan_dev\Development\seqan-trunk-build\vs9\sandbox\my_sandbox\seqan_sandbox_my_sandbox.sln for your sandbox using Visual Studio. Right-click first_app in the Solution Explorer and click Set as StartUp Project. Now, start the program without debugging using Debug > Start Without Debugging.
Visual Studio will now compile your program and execute it. A command line window will pop up and should display the following.
Hello World!
Hello SeqAn!
Press any key to continue . . .
Congratulations, you have successfully created your first application within the SeqAn build system using Visual studio.
Further Steps
As a next step, we suggest the following:
- Continue with the Tutorials
- If you have not done so, install optional dependencies of SeqAn. To read and write compressed files, follow Installing Contribs On Windows.
- Look around in the files in sandbox/my_sandbox/apps/first_app or the demos in core/demos and extras/demos.
- For the tutorial, using the SeqAn build system is great! If you later want to use SeqAn as a library, have a look at Integration with your own Build System.